If you liked the post, Share on Facebook, Tweet and Google Plus (use buttons above). You can also Subscribe to our feed via Email for free.

 |
How to use Google's Android Speech Recognition in Windows PC
on 08 June 2014
Windows operating system is shipped with voice recognition built-in for a few years now. Like most of you, I tried it but it didn't worked very well, and hadn't looked at it since. Microsoft voice dictation requires an expensive mic and takes a long time to set up, and it is not a reliable program for accuracy. There are some products like Dragon which are good but they are too costly. Mobile systems such as Android has very accurate voice command capability when connected to the internet. But how to use Google's speech recognition shipped in Android on Windows PC? Lets see how to do that.
Braina Speech Recognition app lets you use Google's voice recognition in your Windows PC. Google's voice recognition is extremely fast and accurate and this wonderful Android app lets you use Android's speech recognition on PC over a WiFi network. You don't even require a microphone! Yes, Braina for Android App will turn your Android device into a wireless external microphone! Lets see how to use it.
Tutorial
Here is a step by step tutorial on how to use Android's speech to text feature on Windows OS and dictate into any software or website.
- Download and Install Braina App on your Android device.
- Download and install Braina on your Windows PC from this link: http://www.brainasoft.com/braina/
- When you will open Braina app for the first time on your Android mobile phone or tablet, it will ask you to enter IP address. Now to get your IP address and connect your android app with PC app you will have to follow these steps:
- Ensure that your PC and Android device are connected to the same WiFi network. If you don't have a WiFi router, you can also use WiFi Hotspot facility of your Android device to connect or use third party software like connectify to turn your laptop into a WiFi hotspot. Also make sure that Braina is running on your PC.
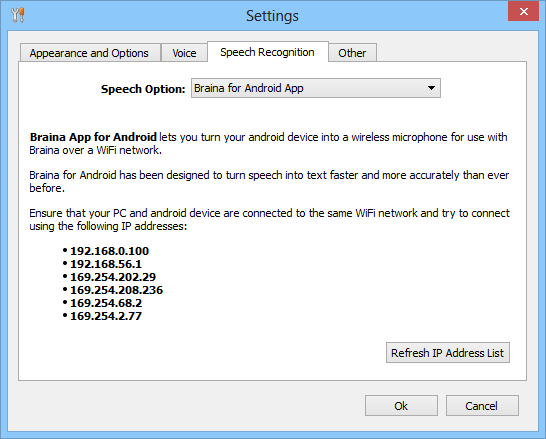
- Now in order to connect, you will need IP address of your PC on the WiFi network. To get IP, go to Tools menu->Settings->Speech Recognition from Braina on PC. From the "Speech Option" drop-down select "Use Braina for Android".
- You will see a list of IP addresses. Enter the first IP address on the list in Android App and click connect. If you get an error, then try entering the remaining IP addresses in the list one by one until you get connected. (Note: IP address will generally start with 192.168)

Important: If there are firewalls in your network, the app might not connect successfully with Braina on your computer. See Frequently Asked Questions for more information: http://www.brainasoft.com/braina/android/faq.html
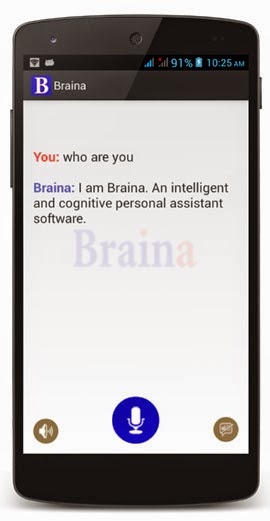
- When your mobile app is successfully connected with PC app, you will see a screen with microphone button in the bottom. To check connection, tab on the button and say something like "Who are you?". This, wont get dictated but Braina will actually give reply to that question as we have not enabled dication mode yet. Braina is actually a personal assistant like Siri for Windows PC. You will see something like this.
- Now in order to dictate into any software or website in your PC we will need to enable dictation mode. To do that tap on the small button which is on the right side of the microphone button (the button which is highlighted in the image below).

- Done. The App's title will show you whether you are in dictation mode or not. Now open some software like Notepad or MS Word and start using voice recognition in your Windows PC!

If you are facing some problem in following the tutorial then feel free to comment below or contact Braina Support.
0 comments:
Post a Comment